NWIFC WQX Exchange Network Node Client Help
1. Overview
3.1 Select the local data source
3.2 Select the data destination
3.3 Enter a recurring schedule (Optional)
3.4 Save/Run/Cancel
4.2 Select the local data destination
4.3 Enter a recurring schedule (Optional)
4.4 Save/Run/Cancel
5.2 Initiate search
5.3 Reload data from TWQD? (Optional)
5.2 Apply additional data filters (Optional)
5.5.1 Column header selection filter
5.5.2 Inline column filter
5.5.3 Advanced filters
6.2 Viewing transaction details
6.3 Downloading transaction documents
7. Adjusting Client Configuration
7.2 Adjusting Outbound Partners
9. Glossary
The Northwest Indian Fisheries Commission (NWIFC), on behalf of its member tribes, received an Exchange Network Implementation Grant from the US EPA to implement an Exchange Network Node (Node) and to deploy the ambient Water Quality Exchange (WQX) data flow. The NWIFC WQX Node Client is designed to support the exchange of information at a tribal office. Using the Node Client, a tribe may:
- Provide WQX data to the EPA or other partner.
- Provide WQX data to the NWIFC.
- Request and receive WQX data from the NWIFC Node.
The Node Client was built with simplicity in mind and is intended to make the exchange of water quality data as straightforward and transparent as possible. The application is supported by a Tribal WQX Node Database that houses the data that is sent and received. The Node Client is automatically updated when newer versions of the application are published.
To launch the application, click Start, All Programs, NWIFC WQX Exchange Network Client and click on NWIFC WQX Exchange Network Client.

This opens the “Home” Form which provides the user with the ability to select and navigate to the area of the application which will support the business process they are attempting to perform (e.g., provide data, import data, view activity history logs or configure the client).
As the application is loaded, an auto-update process will be run to ensure the user is utilizing the most recent version of the WQX client. If a newer version is discovered, the application will be updated automatically.
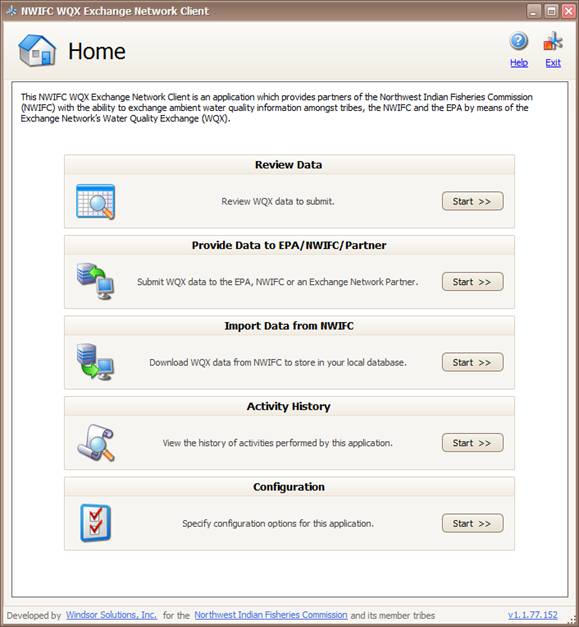
To export data, click on the “Provide Data to EPA/NWIFC/Partner” Start Button
To import data, click on the “Import Data from NWIFC” Start Button.
To view activity logging, click on the “Activity History” Start Button.
To adjust the application settings, click on the “Configuration” Start Button.
To open the help webpage, click on the
![]() icon
or “Help” Hyperlink.
icon
or “Help” Hyperlink.
To exit the application, click on the
![]() icon
or “Exit” Hyperlink.
icon
or “Exit” Hyperlink.
To minimize the application and have it continue to run, click on the
![]() or
or
![]() icon.
icon.
The “Provide Data to EPA/NWIFC/Partner” Form provides users with the ability to send water quality data from a tribe to a partner (EPA, NWIFC, etc.) with an Exchange Network Node for import into the partner’s local data repository. Users also have the ability to select the receiving partner as well as filter the data sourced from the Tribal WQX Node Database based on the data’s sensitivity and the age of the data to be sent. This process can be initiated in real time or on a specified schedule. Users are able to preview data that is to be sent from the Tribal WQX Node Database.
On the “Home” Form, click on the “Provide Data to EPA/NWIFC/Partner” Start Button to open the “Provide Data to EPA/NWIFC/Partner” form.
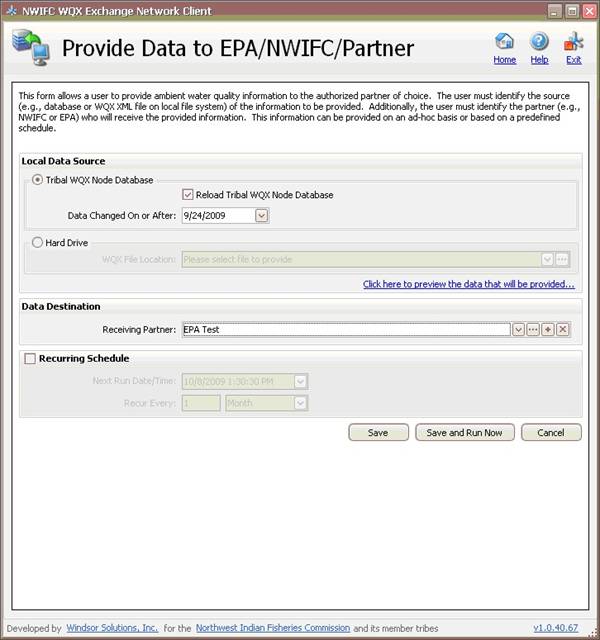
3.1 Select the local data source:
There are 2 options:
a. Tribal WQX Node Database
To select the Tribal WQX Node Database as the source, click on the “Tribal WQX Node Database” Radio Button. This button is selected by default.
To reload the Tribal WQX Node Database with the data that is to be provided to a partner from the source database (which by default is the Tribal Water Quality Database, TWQD), click the “Automatically reload data from TWQD” Checkbox. This checkbox is selected by default. Reloading the Tribal WQX Database ensures that it is updated by any data changes in TWQD.
Enter or select a date in the “Date Changed On or After” Date Picker. Entered/selected date must be greater than or equal to 1/1/1900 and less than or equal to the current date.
b. Hard Drive
To select the Hard Drive as the data source, click on the “Hard Drive” Radio Button. Click on either the “WQXFile Location” Dropdown to select a previously located file or the “WQX File Location” Hyperlink to open a Windows Select File dialog and select file to provide.
For quality assurance purposes, click the “Click here to preview the data that will be provided” Hyperlink to preview and confirm the number of records about to be sent to the selected partner.
![]()
![]()
![]()
3.2 Select the data destination:
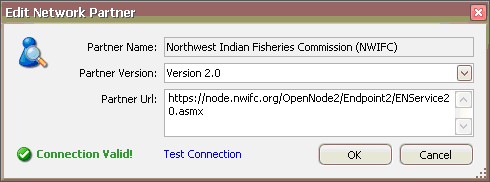
From the “Receiving Partner” Dropdown, select one of the available values. This is set to “EPA Production” by default.
When the “Receiving Partner” is changed, the “Date Changed On or After” will be updated to display the date the client last successfully submitted data to the selected partner.
You may also edit/delete a selected partner or add a new partner by clicking on the one of the buttons to the right of the dropdown. After editing or adding a partner, test the connection by clicking on the “Test Connection” Hyperlink.
3.3 (Optional) Enter a recurring schedule:
If you want this form to run on a recurring schedule, select the “Recurring Schedule” Checkbox. This checkbox is unselected by default.
Select or enter a “Next Run Date/Time”. Enter a unit in the “Recur Every” Textbox and a select a unit of measure from the dropdown.
Click the “Save’ Button to save the entered settings for future use.
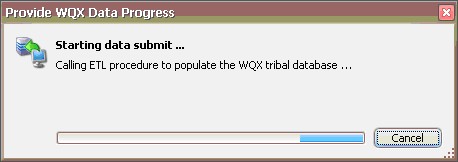
Click the “Save and Run Now” Button to save entered settings for future use and initiate the data export process. Wait for the Node Client to process your request. A status window appears to update progress. You may hit the “Cancel” Button at any time to terminate the process.
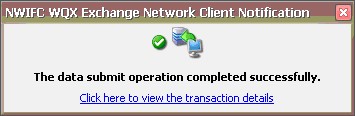
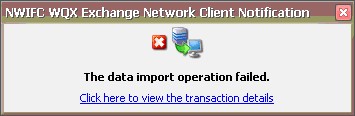
When the process is complete, a notification is received. Click the “Click here to view the transaction details” Hyperlink to view details of the transaction.
To abandon any changes to the “Provide Data to EPA/NWIFC/Partner” Form, click the “Cancel” Button and confirm the cancellation.
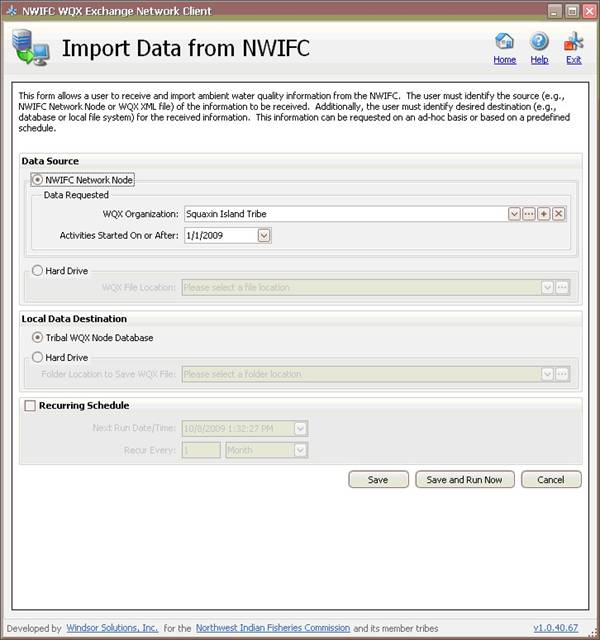
The “Import Data from NWIFC” Form provides users the ability to request data from the NWIFC Exchange Network Node for import into a local repository (database or hard drive). A user may also filter the data based on organization and the date activities started. This process can be initiated in real time or on a specified schedule.
On the “Home” Form, click on the “Import Data from NWIFC” Start Button to open the “Import Data from NWIFC” Form.
There are 2 options:
a. NWIFC Network Node
To select the NWIFC Network Node Database as the source, click on the “NWIFC Network Node” Radio Button. This button is selected by default.
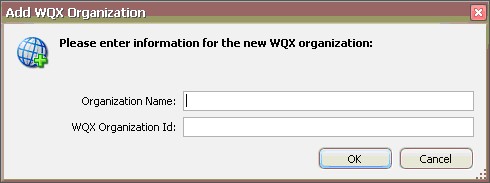
From the “WQX Organization” Dropdown, select the organization whose data is being requested. You may edit/delete an existing organization or add a new one by clicking one of the buttons to the right of the dropdown.
Enter or select a date in the “Activities Started On or After” Date Picker. Entered/selected date must be greater than or equal to 1/1/1900 and less than or equal to the current date.
b. Hard Drive
To select the Hard Drive as the data source, click on the “Hard Drive” Radio Button. Click on either the “WQX File Location” Dropdown to select a previously located file or click on the “WQX File Location” Hyperlink to open a Windows Select File dialog and select file to provide.
4.2 Select the local data destination:
There are 2 options:
a. Tribal WQX Node Database
To select the Tribal WQX Node Database as the destination, click on the “Tribal WQX Node Database” Radio Button. This button is selected by default.
b. Hard Drive
To select the Hard Drive as the data destination, click on the “Hard Drive” Radio Button. Click on the “Folder Location to Save WQX File” Dropdown to select a previously located folder or click on the “Folder Location to Save WQX File” Hyperlink to open a Windows Select File dialog and select folder location.
4.3 (Optional) Enter a recurring schedule:
If you want this form to run on a recurring schedule, select the “Recurring Schedule” Checkbox. This checkbox is unselected by default.
Select or enter a “Next Run Date/Time”. Enter a unit in the “Recur Every” Textbox and a select a unit of measure from the dropdown.
Click the “Save’ Button to save the entered settings for future use.
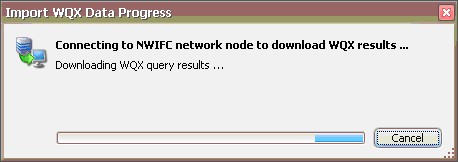
Click the “Save and Run Now” Button to save entered settings for future use and initiate the data import process. Wait for the Node Client to process your request. A status window appears to update progress. You may hit the “Cancel” Button at any time to terminate the process.
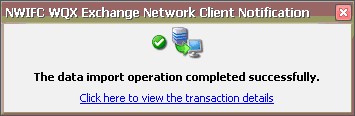
When the process is complete, a notification is received. Click the “Click here to view the transaction details” Hyperlink to view details of the transaction.
To abandon any changes to the “Import Data from NWIFC” Form, click the “Cancel” Button and confirm the cancellation.
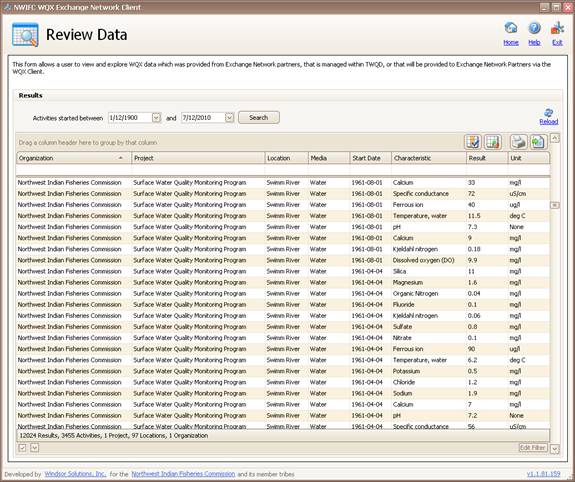
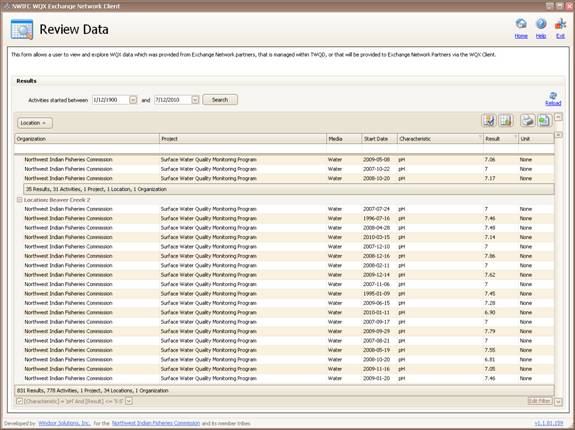
The “Review Data” Form provides users the ability to review data which is available for sharing as well as data that was received from partners (via the NWIFC).
On the “Home” Form, click on the “Review Data” Start Button to open the “Review Data” Form.
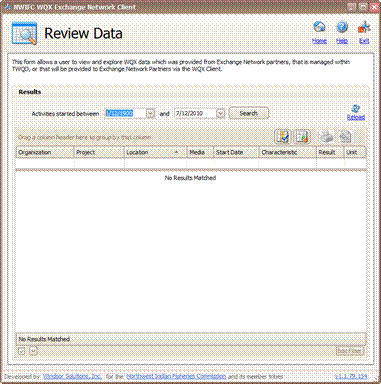
5.1 Select the activity period:
Enter or select dates in the “Activities Started Between” Date Pickers. Entered/selected date must be greater than or equal to 1/1/1900 and less than or equal to the current date.
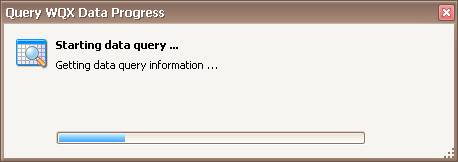
Click on the “Search” Button to initiate the search.
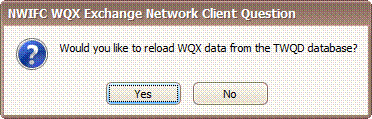
5.3 (Optional) Reload Data from TWQD?
If you are reviewing data for the first time on a given day, you will be prompted and asked if you would like to reload the data found in the NWIFC WQX Exchange Network Client with the data currently found in TWQD. If you answer “Yes” when prompted, the data in the NWIFC WQX Exchange Network Client will be reloaded with the data currently found in TWQD. If you answer “No” when prompted, the data will not be reloaded.
You may also initiate the reload of data from TWQD by
clicking the “Reload” (
![]() )
icon on the upper right portion of the form. If data changes were made in TWQD,
this action will force data in the NWIFC WQX Exchange Network Client to be
refreshed.
)
icon on the upper right portion of the form. If data changes were made in TWQD,
this action will force data in the NWIFC WQX Exchange Network Client to be
refreshed.
You may sort data based on column headers. To sort the data on a column, click on that header.
If the selection is the first consecutive selection of the column, the activity list will be sorted in ascending order by the data present in the selected column. If the selection is the second consecutive selection of the column, the activity list will be sorted in descending order by the data present in the selected column. For instance, to sort the list by Monitoring Location Name (Location), click on the “Location” column. The list will be sorted in ascending order by location. If the “Location” column is clicked a second consecutive time, the list will be sorted in descending order by location.
5.5 (Optional) Apply Additional Data Filters
You can apply additional data filters to the data displayed utilizing column header selection filters; inline column filters or advanced filters.
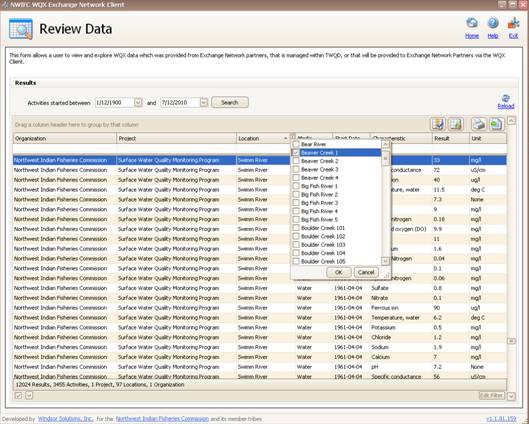
5.5.1 Column Header Selection Filters
To utilize column header selection
filters, place your cursor over a column header and the ‘
![]() ’
icon will be displayed. Click on this icon and all values which are available
for the column in question will be displayed. Select/unselect the available
values as needed and click the OK button. Note: multiple column filters can be
applied at a time.
’
icon will be displayed. Click on this icon and all values which are available
for the column in question will be displayed. Select/unselect the available
values as needed and click the OK button. Note: multiple column filters can be
applied at a time.
![]()
![]()
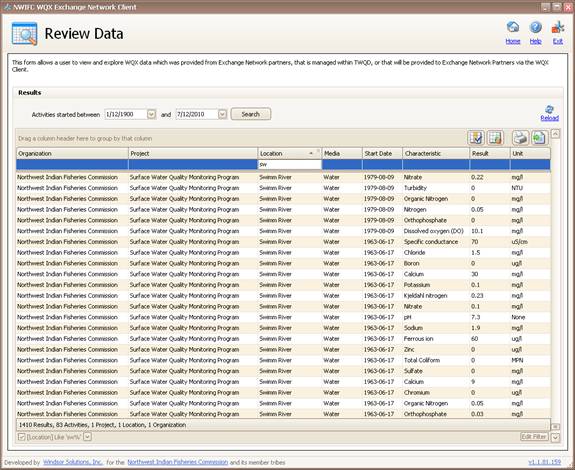
To use inline column filters, enter relevant text into the blank textbox at the top of the column in question. After each character is entered, the list will be filtered to only display those records which have a column value that start with the entered text. Note: multiple column filters can be applied at a time.


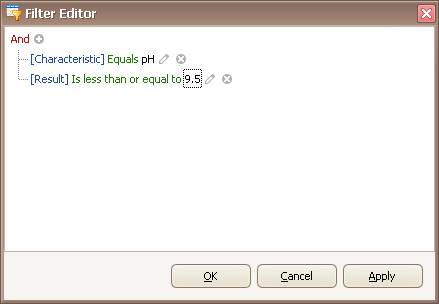
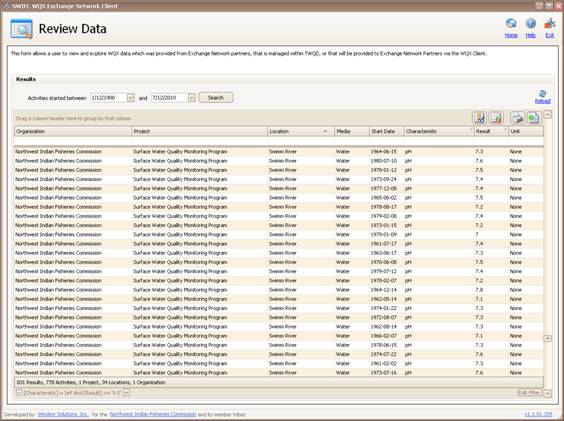
To utilize advanced filters, click on the “Edit Filter” Button at the bottom right of the data grid. A dialog will be opened where you may enter advanced conditional statements e.g. “find all pH values that are less than or equal to 9.5”.
To construct this example, click on the plus (+) sign to add a new condition to the group. If not already selected, click on the column filter Dropdown and select “Characteristic”. Click on the operator filter Dropdown and select “Equals”. Then type pH in the “enter a value” Textbox. Click + again to add a second condition. Select “Result” from the column filter Dropdown, and “Is less than or equal to” from the operator filter Dropdown. Click on the “enter a value” Textbox and enter 9.5. Click on the “Apply” Button to filter and the “OK” button to exit the dialog.
To remove filter and show all data, uncheck the filter statement Checkbox at the lower left corner of the form. You may also click on the filter statement Dropdown to select a previous filter statement.
![]()
![]()
To group by a column, drag that column header to the space above headers. To ungroup, drag the column header back to its original position.


To print the data displayed in the grid,
click on the “Print”
(‘
![]() ’)
icon. A report format will be displayed which can be modified with
additional information to complete the report prior to printing.
’)
icon. A report format will be displayed which can be modified with
additional information to complete the report prior to printing.
To export the data displayed in the grid,
click on the “Export”
(‘
![]() ’)
icon. The data can be exported to Excel (.CSV or .XLS), PDF, or a Web
Page (.HTML).
’)
icon. The data can be exported to Excel (.CSV or .XLS), PDF, or a Web
Page (.HTML).
The Activity History form provides a summary of the activities (i.e. data sent or data received) that have been performed by the WQX Client. The form provides the ability to sort data based on column headers.
On the “Home” Form, click on the “Activity History Start” Button to open the “Activity History” Form. The form is opened displaying the most recent activity first.
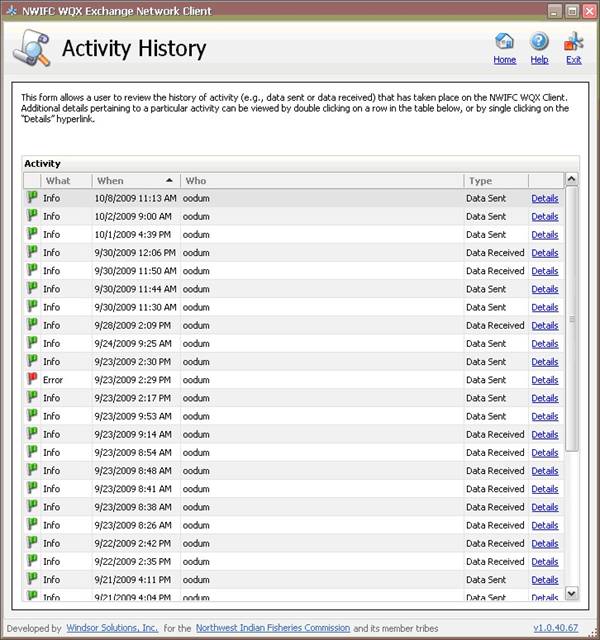
By default, data on this form is sorted by the “When” field in descending order. To sort the activity list on other column headers, click on that header.
If the selection is the first consecutive selection of the column, the activity list will be sorted in ascending order by the data present in the selected column. If the selection is the second consecutive selection of the column, the activity list will be sorted in descending order by the data present in the selected column. For instance, to sort the list by who performed the activity, click on “Who” column. The list will be sorted in ascending order by name. If the “Who” column is clicked a second consecutive time, the list will be sorted in descending order by name.
6.2 Viewing transaction details:
To view details of an activity, click on the “Details” Hyperlink of that activity to be navigated to the “Transaction Details” Form.
This form displays the status of the transaction on the local WQX Client (Local Transaction) as well as the status at the providing/receiving partner (Endpoint Transaction).
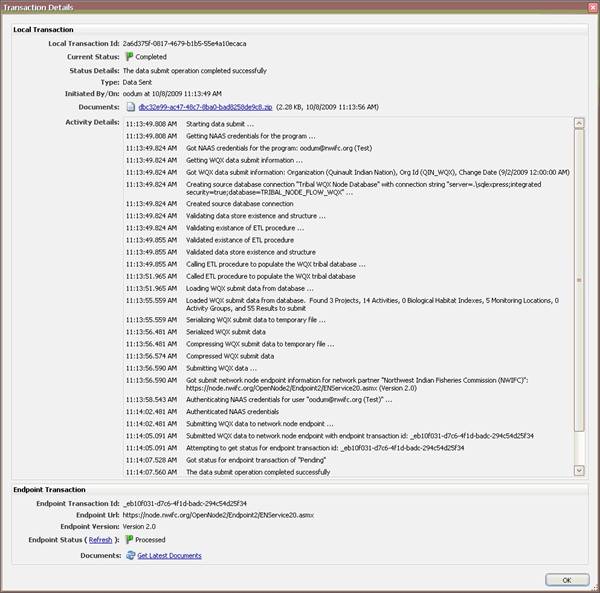
6.3 Downloading transaction documents:
To download the local documents, click on the “Local Transaction – Documents” Hyperlink to open the Windows Save File dialog and select the location where the files should be saved.
Note - the available documents for download will depend on the status of the transaction and the state of the processing on the local WQX Client.
To check the status of the endpoint transaction, click on the “Endpoint Status – Refresh” Hyperlink. A request will be made to the endpoint asking for the status for the transaction. The returned status value will be displayed.
To download the endpoint documents, click on the “Endpoint Transaction – Documents” Hyperlink to open the Windows Save File dialog and select the location where the files should be saved.
Note - the available documents for download will depend on the status of the transaction and the state of the processing at the endpoint.
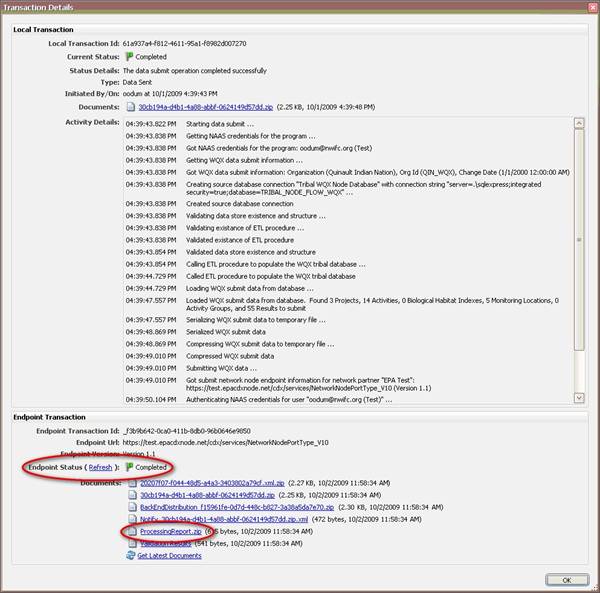
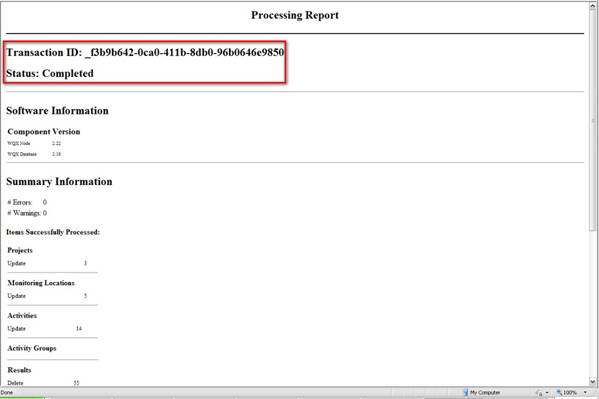
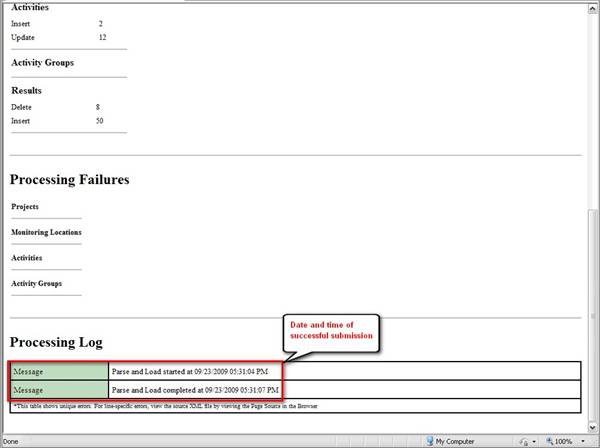
For data exports to EPA, an important file to download is the Processing Report which provides a summary of the transaction at the EPA endpoint. For a successful submission, the report will state a date and time the submission was completed.
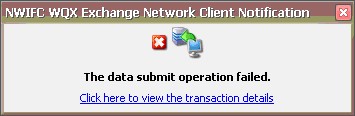
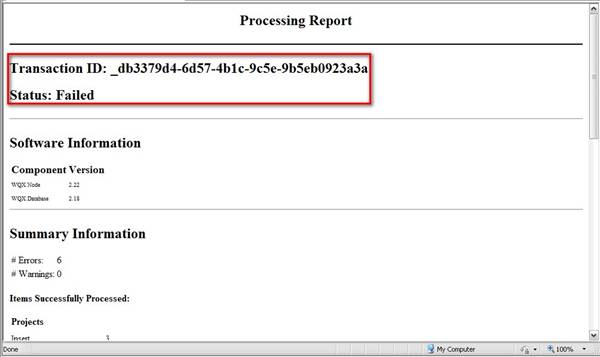
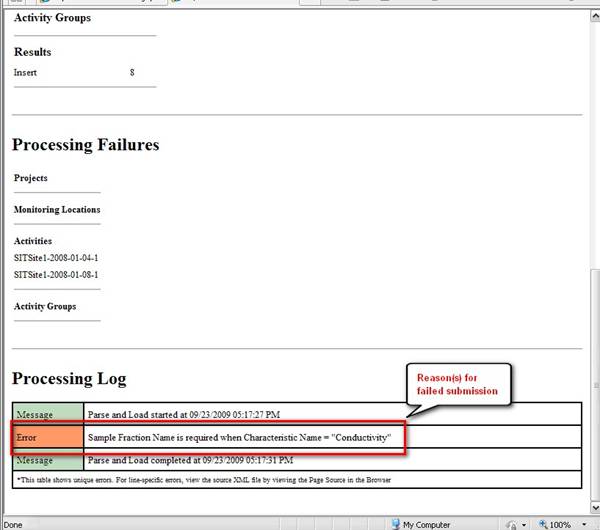
If the submission failed, this report will give reasons for the failure in the Processing Log section:
7. Adjusting Client Configuration
The Configuration Form provides users with the ability to adjust settings utilized by the WQX Client, such as outbound partners, database connections, NAAS accounts, and taskbar alerts.
Note – adjustments to these properties can affect the performance of the client.
On the “Home” Form, click on the “Configuration” Button to open the “Configuration” Form. The form is opened displaying previously saved settings. If an import/export process is currently being processed, a Status window will appear and this form will be unavailable until processing completes.
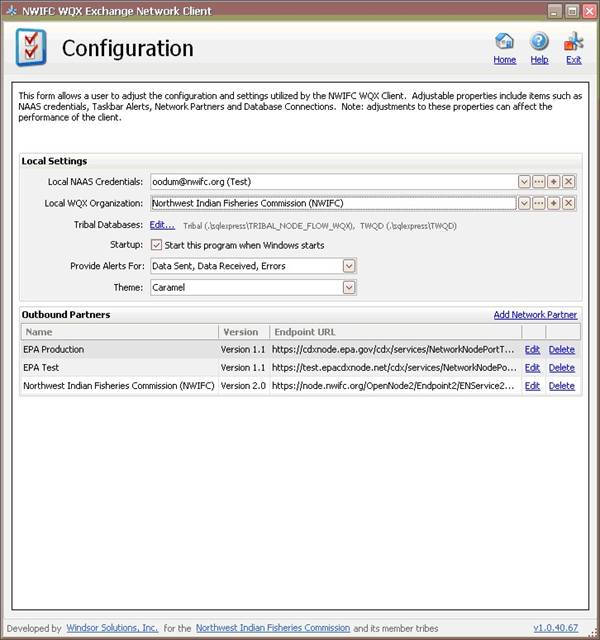
a. Changing User Settings
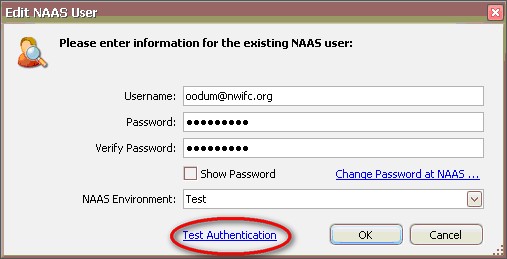
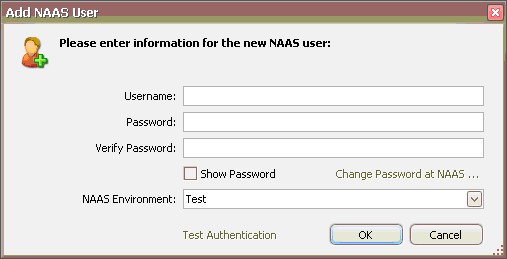
From the “Local NAAS Credentials” Dropdown, select a user for the client. You may edit/delete an existing user or add a new one by clicking one of the buttons to the right of the dropdown. To change user password, click the “Change Password at NAAS” Hyperlink. Anytime changes are made, it is a good idea to test the NAAS authentication by clicking on the “Test Authentication” Hyperlink.
b. Changing Organization Settings
From the “Local WQX Organization” Dropdown, select an organization for the client. You may edit/delete an existing organization or add a new one by clicking one of the buttons to the right of the dropdown.
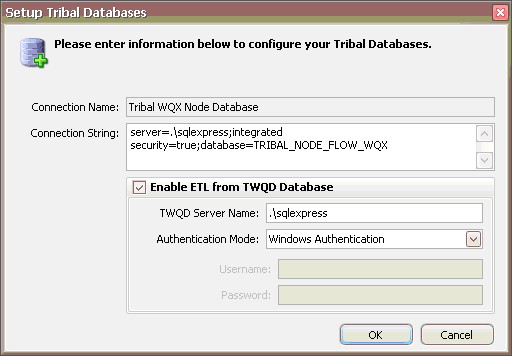
c. Changing Database Settings
To configure the tribal databases, click the “Edit Tribal Databases” Hyperlink and enter the required information. The default settings are for an SQL Express and TWQD installation on a local machine.
d. Changing other user preferences
To make the client start when Windows starts, select the “Startup” Checkbox. This checkbox is selected by default. Use the “Provide Alerts For” Dropdown to select when alerts are provided by the program. All alerts are selected by default. Use the “Theme” Dropdown to change the theme (color scheme) of the client. Caramel is selected by default.
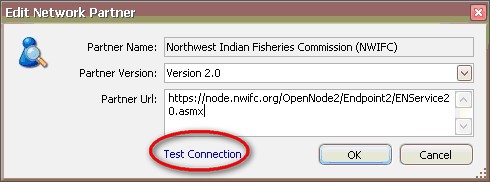
7.2 Adjusting Outbound Partners:
By default, the list of outbound partners will be sorted by the Name column in ascending order.
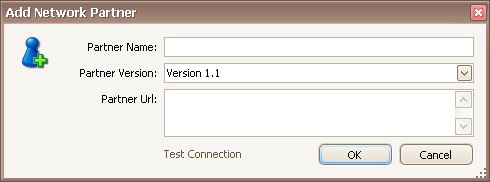
To add a partner, click the “Add Network Partner” Hyperlink and enter the required information.
To edit a partner’s credentials, click the “Edit” Hyperlink. Anytime changes are made, it is a good idea to test the connection by clicking the “Test Connection” Hyperlink.
To delete a partner, click the “Delete” Hyperlink. You would be prompted to confirm the removal of the partner from the outbound partner list and the "Configuration" Form will be refreshed.
Providing Data – Number of records in the “Review Data” Form do not match what is in the database.
Check the “Data Changed On or After” date. Only data changed on or after the entered date will be filtered for submission. Also ensure that the data is marked in the database for submission to EPA.
If you need further help, please contact Osa Odum (oodum@nwifc.org;
360.528.4371) or
The process by which a user's identity is verified. The NWIFC WQX Exchange Network Client passes the user's saved username and password to EPA’s NAAS service for authentication.
A "Flow", "Data Flow", or "Exchange" is a set of services relating to a particular environmental business area such as waste, water or air quality.
The web address (URL) of a node.
NAAS (Network Authorization and Authentication Services)
A set of centralized information security services that Exchange Network partners can use to authenticate and authorize their users. NAAS provides an efficient way for Exchange Network participants to exchange data, without having to build and maintain their own security system. There is a test and production NAAS implementation.
National Environmental Information Exchange Network (Exchange Network)
An Internet and standards-based information network among EPA and its partners in states, tribes, and territories that permits partners to securely and automatically exchange environmental data.
An Exchange Network partner's point of presence on the Network. Essentially, a Node is a piece of software that securely initiates and responds to requests for information. With properly configured Nodes, Network partners can seamlessly exchange data regardless of hardware, operating system, or programming environment.
A stand-alone application (such as the NWIFC WQX Exchange Network Client) that can initiate Exchange Network requests. Node clients can submit, request, and receive results from a request on the Exchange Network. However, clients cannot respond to data queries, and therefore cannot publish data on the Exchange Network.
An authorized entity (i.e. Tribe, State or Federal agency) that has requested and received the necessary Network Authentication and Authorization Services (NAAS) credentials.
TWQD (Tribal Water Quality Database)
A WQX-complaint SQL Express database developed by the Northwest Indian Fisheries Commission.
A framework that allows Exchange Network partners to submit and share ambient water quality data with over the Internet.